Laravel: Anonymize database on local environments for GDPR

If you often need to work with a copy of a production database on your local environment, you might have to anonymize the contents of all personal data due to restrictions of the GDPR. I often ship my Laravel projects with an artisan-command called “CleanupPersonalData”, in which I add some logic to purge all privacy-sensitive contents from the database.

Looking for a similar solution? Notice that this always requires manual implementation, since you need to review which data/columns in the database are personal, and which not.

Let take for example a simple ‘User’ model. After downloading a copy of your production database, you have a copy of all users, probably including columns as first_name, last_name, email and password.

namespace App\Console\Commands;

use App\Models\User;
use Illuminate\Console\Command;
use Illuminate\Support\Facades\DB;

class CleanupPersonalData extends Command
{
    /**
     * The name and signature of the console command.
     *
     * @var string
     */
    protected $signature = 'cleanup:gdpr {aggressive?} {force?}';

    /**
     * The console command description.
     *
     * @var string
     */
    protected $description = 'Cleanup Personal data for local environments';

    /**
     * Create a new command instance.
     *
     * @return void
     */
    public function __construct()
    {
        parent::__construct();
    }

    /**
     * Execute the console command.
     *
     * @return mixed
     */
    public function handle()
    {
        if ('production' == config('app.env')) {
            abort(403, 'This command should only be run in local/testing environments!');
            exit;
        }

        // do we want to force overwrite contents, or check if this was anonymized before?
        $force = false;
        if ('true' == $this->argument('force')) {
            $force = true;
        }

        // prepend this string to anonymized data (also to check if anonymized before)
        $anonymizeString = 'anonymized: ';

        // using Faker class to generate new dummy content
        $faker = \Faker\Factory::create('nl_NL');

        // START MODEL 1 (USER)

        // specify a main table-column you will be checking for if the data was already anonymized
        $mainColumn = 'lastname';

        // make sure we fetch trashed items as well (if soft-deletes is enabled)
        $items = User::withTrashed();

        // if not forced, check if anonymized before
        if (!$force) {
            $items
                ->where(function ($query) use ($mainColumn, $anonymizeString) {
                    $query->where($mainColumn, 'NOT LIKE', DB::raw($anonymizeString) . '%');
                    $query->orWhereNull($mainColumn);
                });
        }

        // get all items as a Collection
        $items = $items->get();
        $this->output->writeln(sprintf('%s users', $items->count()));

        // make it easy for us to login to test-users (do this once, since hashing consumes a lot of memory / cpu)
        $pass = bcrypt('123456');
        foreach ($items as $item) {
            if ($force || strpos($item->$mainColumn, $anonymizeString) === false) {
                $item->$mainColumn = $anonymizeString.$faker->lastName;
                $item->firstname = $faker->firstName;
                $item->email = $faker->safeEmail; // to make sure we won't send any emails to real addresses
                $item->password = $pass;
                $item->save();
            }
        }

        // END MODEL 1 (USER)

    }
}


Repeat the above for multiple Models and you no longer have to worry about data-leaks. Make a copy of your production-database, import it into the local environments, run the command

php artisan cleanup:gdpr

and make sure to delete the original backup-file.

Gepubliceerd op
Gecategoriseerd als Laravel

Update WordPress on the command line (SSH) without downtime

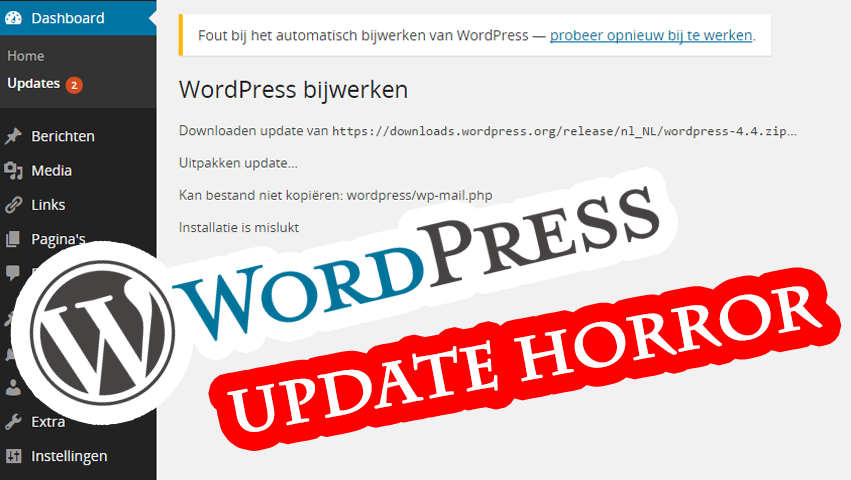
If you’re a webdeveloper and set up a lot of WordPress-websites, you get a lot of inquiries to update WordPress as well. And sometimes, for instance if the client is running on a VPS or poorly managed server, WordPress won’t update the easy way. Continue reading if you’re tired of these types of messages over and over again:

Unable to locate WordPress Content directory

Or

Downloading update from https://downloads.wordpress.org/release/nl_NL/wordpress-4.4.zip…
Unpacking the update…
Could not create directory OR Could not copy file wp-mail.php
Installation Failed

Heck, you’ve even tried to define all sorts of other settings in wp-config.php like
define('FS_METHOD', 'ftpext');
define('FTP_BASE', '/domains/mydomain.com/public_html/');
define('FTP_CONTENT_DIR', FTP_BASE.'wp-content/' );
define('FTP_PLUGIN_DIR ', FTP_CONTENT_DIR.'plugins/' );
define('FTP_USER', 'myuser');
define('FTP_PASS', 'mypassword');
define('FTP_HOST', 'myhost.com');
define('FTP_SSL', false);

Update WordPress hosted on a VPS

If the above sounds familiar and you don’t want to waste anymore time on updating WordPress, connect to your site through SSH, become root, and do the following below (assuming you’ve made backups, didn’t do anything fancy/hacky in the WordPress-core files, etc. etc.).
Copy and paste the following into a text-editor, adjust path on line number 1, copy, paste in terminal. Your update is executed in about 5 seconds.

cd /YOURDOMAIN/PUBLICFOLDER/
mkdir customupgrade/
mkdir customupgrade/old/
wget https://nl.wordpress.org/wordpress-latest-nl_NL.tar.gz -P customupgrade/
tar xfz customupgrade/wordpress-latest-nl_NL.tar.gz -C customupgrade/
rm -rf customupgrade/wordpress/wp-content/
yes | mv index.php customupgrade/old/
echo "BRIEFLY UNAVAILABLE FOR MAINTENANCE." > index.php
yes | mv wp-includes customupgrade/old/
yes | mv wp-admin customupgrade/old/
yes | mv wp-blog-header.php wp-login.php wp-signup.php wp-activate.php wp-comments-post.php wp-links-opml.php wp-mail.php wp-trackback.php wp-cron.php wp-load.php wp-settings.php xmlrpc.php customupgrade/old/
yes | mv customupgrade/wordpress/* .
mv customupgrade/old/ oldwordpressbackup/
rm -Rf customupgrade/

Now login to your website (YOURDOMAIN/wp-admin) and WordPress will ask you to upgrade the database. And… you’re done.

If something fails, you have a copy of your old WordPress-installation in the “oldwordpressbackup” folder (or if one of the commands fails: it’s located in customupgrade/old).

Set the correct permissions to all WordPress-files and folders

Oh: if you’re at it, you need to set the correct permissions to all files again. For example: (credits: http://stackoverflow.com/a/18352747)

chown apache:apache -R *
find . -type d -exec chmod 755 {} \;
find . -type f -exec chmod 644 {} \;

Need more information on what we were doing? Here goes:

1) we go into the public_html folder
2) create a directory called “customupgrade” with subfolder “old” (we store the old files here)
3) download the new WordPress file (in this case the Dutch 4.4 pack) into the “customupgrade”-folder
4) untar the file
5) remove the wp-content directory from the downloaded archive (we are keeping our own themes and plugins).
6) move the index.php into a backup-location
7) create a custom message saying the site is under maintenance
8,9,10) move all old files into backup-location
11) move the new files in from the archive (the index.php is being overwritten at this point, ending the maintenance mode)
12) rename the backup-folder
13) cleanup the temporary upgrade folder

Gepubliceerd op
Gecategoriseerd als Wordpress

Speed up responsive webdevelopment with CSS Less (Windows): for beginners

Update October 2021

This is horribly outdated. You’d better search for a SCSS-solution. But hey, maybe you have an old project you need help on…

You probably already know Less, the CSS “pre-processor”. Basically Less does exactly what it’s called: you can create your css-files with less typing.

The true advantages of Less are that you can use variables and so-called “Mixins”, which are functions/sets of code you use multiple times in your css. Forget about browser-prefixes and typing a whole set for a simple border-radius, just make use of the mixins.

To get started in a few minutes:

  1. If on Windows, download and install WinLess, a neat and handy GUI which will parse your less-files into CSS and minify them on the fly (automatically, everytime you save your file)
  2. Add the folder you are keeping your Less-files in (your css directory).
  3. Create a Less-file (e.g. all.less), with for example the following contents.

I use a less boilerplate (all.less) for my new projects as following:

/* Default functions */
@import "mixins";

/* Use your preferred reset stylesheet! e.g. http://git.io/normalize */
@import (inline) "reset.css";

/* Any plugin CSS-files here, e.g. font-awesome */
@import (inline) "font-awesome/font-awesome.min.css";

/* All the basic styles, mobile first */
@import "basic"; /* refers to a file called basic.less, which you create yourself */

/* Tablets */
@media screen and (min-width:768px) { 
	@import "res_768"; /* refers to a file called res_768.less, which you create yourself */
}

/* Desktop */
@media screen and (min-width:978px) {
	@import "res_978"; /* refers to a file called res_978.less, which you create yourself */
}

/* Large Desktop */
@media screen and (min-width:1200px) {
	@import "res_1200"; /* refers  to a file called res_1200.less, which you create yourself */
}

Create your own mixins.less file or use a template, like the one on lesselements.com.

In your imported stylesheets (basic.less, res_768.less etc) also place the first line @import "mixins"; to make sure WinLess finds your mixins.

Now start your work in basic.less (mobile-first approach) and keep a clean structure as for example:

header { }

.mainContainer {
	section {
		position: relative;
		.entry-content {
			p {
				margin: 0 0 1em 0;
	
				&:last-child{
					margin-bottom: 0;
				}
			}
		}
	}

	aside { }
}

footer { }

You will notice that all.less is generated into all.css, which contains all the minified css, including the responsive css. Optimized for production right away!
Good luck!

Responsive circles with CSS3

Ever needed to create a circle with CSS only? Before CSS3 that was quite impossible (apart from the content: ' \25CF'; with a large font-size). But with CSS3, you can even create responsive circles!

Let’s say the width of your circle is 25% of the container div. If your circle is in a square div, you could easily give the circle a height of 25% as well, and all is fine (based on the assumption your container is a responsive square). But if your container has a flexible height, the following code will help you out:

.circle {
   height: auto;
   padding-top: 25%;
   width: 25%;
   border-radius: 50%;
   /**
    * Update November, 2014
    * http://caniuse.com/#search=border-radius
    * prefixes -webkit- and -moz- no longer really needed
    */
}

You can find a demo here.

See what happened?
Percentages defined within a padding in CSS, are calculated based on the width of the container. This means that if you use a padding-top to the circle that equals the width, it will give the element the same height as its width.

Enjoy!

P.S. You could also define the width of the circle as a padding-left with “10%” and give the circle a “display: inline-block” or a “display: block; width: auto; float:left;” to accomplish the same thing. I prefer setting the width, as it doesn’t require me to define the block as an inline-block, or a floating block, which will require you to clear the floats again, or find a backwards-compatibility solution for IE7 and lower.